Flash and slow shutter speed - Part I: creative blur
When taking a portrait, the most important thing in your picture is the main subject. The background should be cool but the subject should be the main focus. You need to separate your subject from the background by, for example, narrowing the depth of field to blur it, restrict the flash light with a grid spot so it only light the subject and leave the background to the ambiance light or throw the background to some motion blur and maintaining the subject acceptably sharp.
This technique does not require you to own a fast lens (with great aperture), you don't even need a moving background, but you need to own an external flash gun triggered off-camera. It will help you make the background less obvious by bluring it in a stylish way and also create some special mood to the picture.
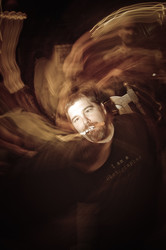
The photograph above was taken in a pub after David Hobby's Strobist seminar in London. Paulo Rodrigues, a good friend a photographer, accepted to be my victim that night. Paulo is a very creative photographer and always come up with cool idea either to shoot or to improve your own idea. I was demonstrating the technique to some persons and at the view of the result, Paulo decided to take some medication tablets in his mouth to add a more psychopath effect to the already freaky result. But let's start from the beginning and we'll come back to this picture later on.
What is required to acheive those kind of pictures are:
- a low ambiant scene with some bright spots or small bright areas.
- the ambiance light needs to hit the subject as less as possible. The best is to have a brighter background and the subject is in the shadow, the more contrast the better.
- a zoom lens, my examples are all shot with a Sigma 10-20mm f/4-5.6, but we'll see an example with a prime lens.
- an external flash gun with the ability to be triggered off-camera.
Last year, the LPMG (London Photographic Meetup Group) organized a photo trip to Tunbridge Wells and Groombridge ("Pride & Prejudice"). The trip started in Tunbridge Wells where we had some times to shoot some old steam trains and got on one that took us to Groombridge. Groombridge Place Gardens & Enchanted Forest are great place to visit for a walk or to photograph. At the end of the "Secret Garden" there was a little bush where very little light could come thru the foliage, creating little spots of light, that was an ideal place for trying out the technique.
Zoom-out blur technique:
I've set an SB-600 mounted with a DIY grid spot on a light stand at camera's right and asked my wife to pose for me in front of the ambiance back lit foliage. Using the flash test button, I made sure that the flash light is hitting her head and bust only by changing the angle of the flash and its distance to my wife (the closer the flash, the narrower the beam). I then shot few test shots until my flash is properly exposed for my wife's skin tone at 250th of a sec. Once that exposure obtained, I changed the shutter speed to a 6th of a second. This is a quite slow shutter speed that would give my lots of blur at any movement of my camera or of my subject. But that's the objective here!
Now I change the settings on my camera to have it shoot using rear curtain (2nd curtain) mode. In this mode your flash will be triggered only when the second curtain starts to close and not when the first curtain is fully open. This is important to maintain your subject sharp! Because it will make the flash throw its pulse of light at the end of the exposure freezing your subject and superimpose a sharp image of your subject over a blur movement. If you are shooting in first curtain then you can end up with your subject also blurred due to the movement as the flash is triggered at the beginning of the exposure and the blurred image will be superimposed over the flashed image.
Having my lens at the longest focal length (here 20mm), I will start to unzoom it in a slow and regular speed down to the shortest focal length (here 10mm). As I was zooming out, I pressed the shutter button and the exposure started and during a 6th of a second the camera would record the image including all little movements of my camera, subject or background. The flash has not been triggered yet so I know that the image would be blurred. That blurred effect would give the impression of jumping into the subject. But as I was shooting rear curtain, my camera will automatically trigger my flash at the end of the exposure. The flash pulse is so fast (around 1000th of a second in full power to much faster if using less power) the result of this is a sharp image of all objects lit by the flash light.
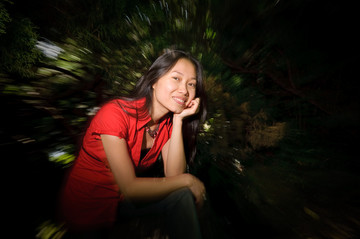
Here is the result of that first variation of the technique:
As you can see, my wife's face is quite sharp and as the flash light felt off, the blur effect started to act (see her lower hand). The foliage, not hit by the flash hasn't been frozen so appeared blurred. Some branches on the right side of the picture are sharper than the rest due to the fact that they are close to my wife and are receiving some light spilled from the beam of light coming from the flash on the left. To avoid that you can move both your subject and flash farther away from the background. If you want to have blurry edges from your subject, try to do a zoom in instead of zooming out. By zooming in your subject will start to be small in the frame then will progressively get bigger, the flash will then freeze a sharp big image of the subject over the smaller blurry one.
Note: to have longer trailing effect on the background you can either zoom/unzoom faster or have a longer shutter speed and zoom/unzoom throughout the exposure. But with a longer shutter speed you'd better have steady hands or use a tripod to avoid shakes, unless that is what you want.
Spinning blur technique:
This technique is not very different from the previous one, but instead of creating a motion blur effect by zooming the lens, you will do it by spinning your camera.
Start holding your camera in portrait mode and begin to spin it back to landscape mode in a slow and regular speed. As you spin the camera, press on the shutter button to start the exposure. If set on rear curtain, your flash will be triggered at the end of the exposure, freezing the subject and removing all blur effect on it.
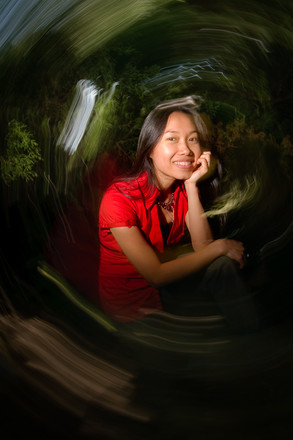
The spinning blur technique is quite difficult to get though as spinning the camera with hands like mine will result in not very circular trails of light:
Spiral blur technique:
This technique is a mix of the two previous one: you will unzoom your lens and spin your camera at the same time!
Set your lens to the shortest focal length and hold your camera in landscape mode. Now keep holding the zoom ring of your lens with your left hand and with your right hand spin the camera until you cannot spin it any more because you've reached the longest focal length and the ring is blocking the movement. From that position, start to spin back to landscape mode in a slow and regulare speed (vary the spinning speed to change the length of the trail of light). As you spin your camera press on the shutter button. As you can guess, by spinning back to landscape mode you will at the same time unzoom the lens.
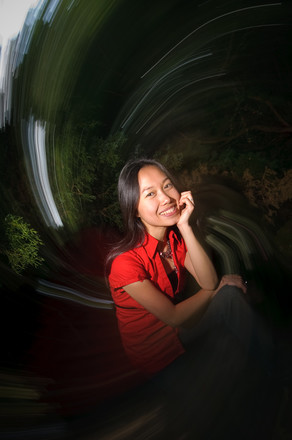
And tada...
In this picture, I've just held the camera in portrait mode and started the spinning motion, I did not want to end the picture in landscape mode to give a little angle to the portrait.
Back to Paulo portrait above (his t-shirt is saying "I'm a photographer not a terrorist"). As you may guess I've used the spiral blur technique for this shot. The existing lighting and ambiance of the pub was such that it gave a spooky effect to the resulting pictures. This triggered some weird and creative neurons in Paulo's brain, he came back with some medication tubes and tablets and put them in his mouth. The result is a sort of capturing what you would see when under control of drugs, the world is spinning around you, people are ghosty... (no, I'm talking from experience!).
Crap backgrounds:
These techniques can save you when shooting some rehearsals in messy locations.
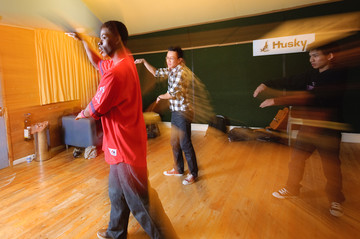
I've recently met Long Vo, another vietnamese Strobist from London. He invited me to join him in a photoshoot for VoiceUp a singing contest organized by Vietnamese student in London. Their rehearsal was held at Husky Studios. One of the rehearsal room was full of contestant practicing and having their belongings all over the place, my wide angle lens is catching everything and with an maximum aperture going from f/4 to f/5.6, everything was sharp. So I decided to try some zoom-out blur technique. The resulting image still shows the background, but the blur effect adds some coolness and make you forget (more or less) the messy background. The issue here was that the background as lit as the subjects and did not contain any bright spots so you cannot hide a lot of it, I could not kill the ambiance as it would also kill the blur effect. But of course what you can do is go clean up the mess and shoot again!
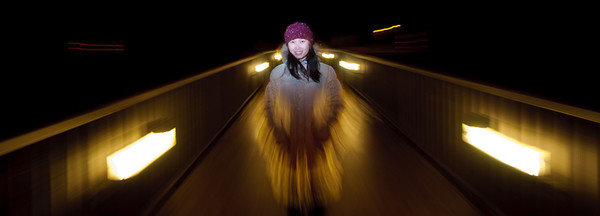
To end this series, here is a portrait of my wife (she is now my most shot model :-P). It was taken few days after 2009 new year's day. We went on a two days trip to Snowdonia (Caernarfon) with my mate Frank. It was decided at the last moment. My wife and I slept over at Frank's place in Uxbridge. I couldn't sleep because of an allergy that gave me swollen and itchy eyes. But we still woke up at 4am, jumped in Frank's car and drove up to Wales! I slept at the back this time to try to catchup with my nearly white night. Hopefully the sound and vibration of a car always help me sleep :-) Arrived in Wales we found a shop that sells antihistamines and after couple hours my eyes went back to a decent shape and I could start shooting away!
We've booked a B&B in Caernarfon close to a bridge. The bridge was lit by some tungsten lights on its sides, that was ideal for another zoom-out blur technique!!! I used Frank as a VAL (Voice Activated Lightstand) holding my SB-600 mounted with DIY grid spot aiming at my wife's face. Dark brackground with small bright areas, perfect!
Tweet


Comments