


Micheldever Wood - Part IV - Photo analysis & Video footage

Thank you to all for your comments and feedbacks on both this blog and my Flickr stream, much appreciated!
In exchange, I will share with you the secrets behind these photographs. What you will find inside today's post:
- three terrific video footages of the photoshoot in Micheldever Wood. These were filmed by SnapperJack and edited with the help of Event DV.
- analysis of the shots in the wood
- analysis of the shots in the field
First, here is the video footage of the photoshoot, more video clips at the end of the post:
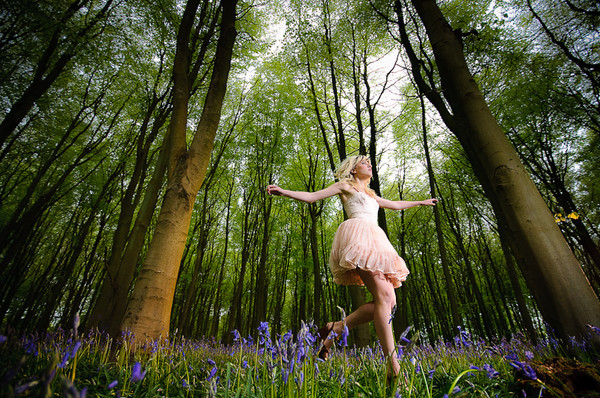
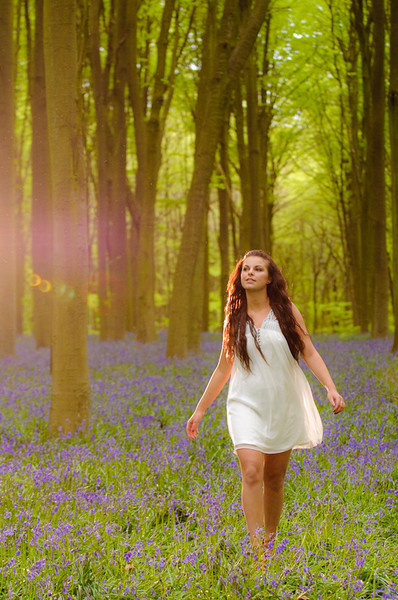
"Lyvia the Elf" shot:
In order to fully appreciate this shot here is how the wood looks likes shot in aperture priority mode:

Pretty dull huh? Not very surprising as it was before noon and the sky was cloudy. Far from what you usually see of a sunset shot of a bluebells wood where some golden sunlight travels through the trees.
But here is what I managed to get:

Much more interesting isn't it? So you're probably going to ask me how I got the sun. The answer is a couple of CTO (warming) gelled speedlights. Speedlights are not only used to light the model, you can also use them to light up the background even if that background is a wood. As you can see in the picture above, I didn't light the whole wood, which would have been a damn hard job to do with speedlights and I'm not Joe McNally playing with 13 flashguns (see Joe's video preview here and the Hands on Guide to Creative Lighitng DVD here). You just need to light the part of the picture that you can see through the viewfinder and probably just part of the foreground or/and background if you have multiple speedlights. The CTO gels will give a golden color to your light to simulate a nice sunset reaching the trees. So I set a SB-900 and a SB-600 with gelled CTO on a lightstand (using a clamp for the 2nd speedlight) and set them far at camera right in the background shooting back at the trees in the foreground.
The far background is lit by the available ambient light (overcast day light thru the foliage). To make the picture more dramatic I switched the camera settings to Manual mode, applied the combo ISO/Shutter Speed/Aperture and under exposed the scene. To under expose the ambient light I could either close my aperture, dialed down by ISO or choose a faster shutter speed. My D300 can handle an ISO of 400 without problem, I wanted to keep my aperture at f/4.0, an aperture I really like and for this situation it ensured sharpness for the model. Choosing a faster shutter speed of 1/200 sec also allowed me to avoid any movement blurred (even though with a 35mm a shutter speed of 1/60 sec would have been enough). That is far from being the best combo setting but I acted by instinct and it worked.
Lets have a test shot and see what we got already:

That's not too bad, after few test shots I got what I think worked for the 'sunset' lights. The far background trees are nicely lit by the under-exposed ambient light. But the model is in the shadow. The trees on the right was right between Lyvia and the couple of strobes in the background, she is thus lit only by the ambient which was under-exposed. So to bring her back to the light, I've used another SB-900 shooting into a silver umbrella at camera right between me and Lyvia pointing from above down back at her. Again a few test shots to get the exposure right and we're ready to rock! Why a silver umbrella instead of a white shoot through? As this is an environment portrait, I can't have the umbrella very close to the model, so using a shoot through umbrella will be a waste of power, a silver umbrella is more effective at a distance.
Back home, I got attracted by the picture "Lyvia the Elf", it's the kind of shot I like: beautiful landscape, beautiful model with no angle effect. It reminds me of my shot in Dover: "The Princess of St Margaret's Bay". So I decided to give it a similar treatment: make the background a bit darker and create multiple layers of added lens blur effect to simulate a shallow depth of field. But for this shot I wanted to give a more 3D feel like in video games where you have the foreground, middle ground and background going at different speed. So I duplicated the whole image four times in four different layers:
- to the first layer I applied a lens blur effect with an amount that seemed right
- the second layer would be the original image
- the third layer got applied a slightly more pronounced lens blur effect
- the fourth layer got applied much more lens blur effect
If you are familiar with tilt/shift effect this is similar but with more work to make the blur more accurate. In most of tilt/shift effect pictures I've seen the issue is people usually just create a gradient blur and don't fine tune it, the result is a building that is blurred at the bottom and sharp at the top... In my case it you would see lots of bluebells partly sharp and partly blurred. To avoid this I used a mask to keep the blur/sharpness on a whole stem (more or less, but it's still much better than just apply the effect). Of course this takes more time, but the effect is worth it.
Once you've added the blur to a layer you need to use the mask and brush to decide what to part of the picture belongs to which type of blur. So I needed to cut out the model and the foreground trees from the third and fourth layers, then cutout the several middle ground trees from the fourth layer. On the first layer I just kept the bottom part of the image.
This is a very long process that is out of topic in this post, but you got the idea.
Here is the lighting diagram:

The running shot:
For this shot I used the same settings as the shot above. The only change is a switch from my Nikon 35mm f/1.8 to a 10-20mm f/4-5.6 Sigma and a change in my position and angle of shoot: I was laying on the ground.
The portrait shot:

Again same setup but now I positioned myself so that the background (sunset) lights are now right behind Lyvia using them as hair light as well.
Dramatic clouds:
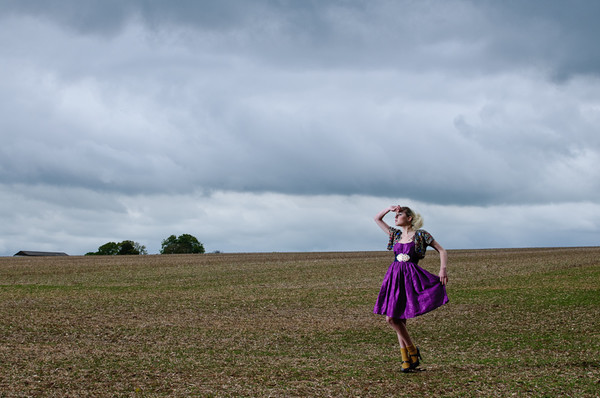
For these shots, all you need is to under expose the sky then bring in two flashguns on a lightstand and shoot with a lot of power. The blue sky is obtained by adding a full CTO and a quarter or half CTO gel on each of the flashguns and set your white balance to tungsten. See my post on how to shoot in a cloudy day for more details.
Summer in winter:
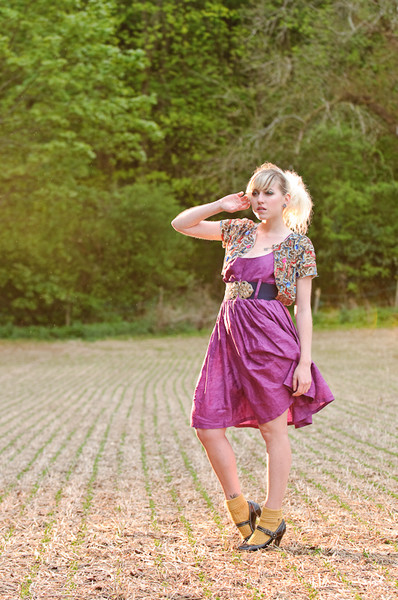
Or summer in a cold cloudy spring day... Well It's basically the same setup as above but the background is different and you also set the lights behind the model pointing back at her and your lens in order to create a little lens flare. The dusty air added to the picture by being lit up by the beam of light. Half or full CTO gel will help giving a more summery feel to the image. As a bonus, the back light is also acting as rim and hair light for our blonde model. You can shoot here in aperture priority and over expose the whole image a little bit using the exposure compensation settings on your camera. In Manual mode, just take a few test shots until happy with both histogram and LCD.
Amaya Jayne walking in the wood:
This was also shot with the same setup as the previous shot of Lyvia in the field. A different location will give a slightly different feel but we still have a lovely summer photograph while the models where freezing their bottoms for the sake of photography. You girls are really brave!
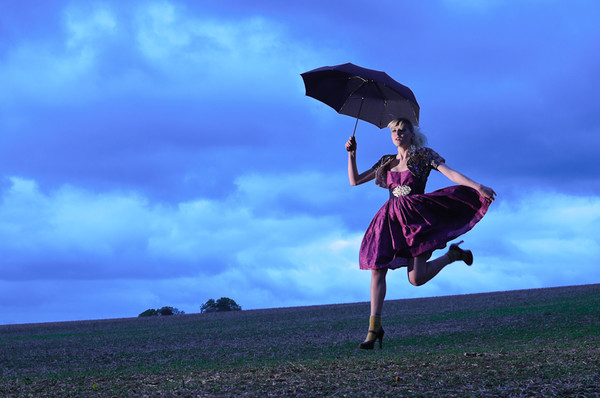
Against the sky:
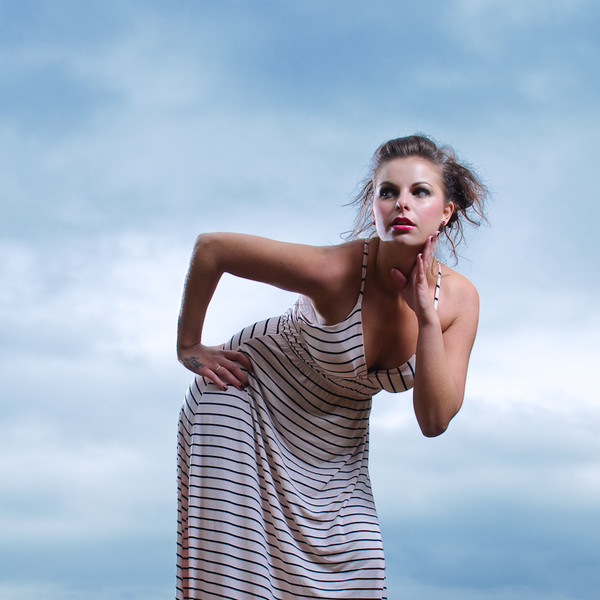
A SB-900 into a silver umbrella as key light at camera right, a bare SB-900 at the back for rim light at camera left. Then in post processing increase the natural blue tint in the clouds (they seem dark grey but sometimes do have a blue cast).
High key headshot:
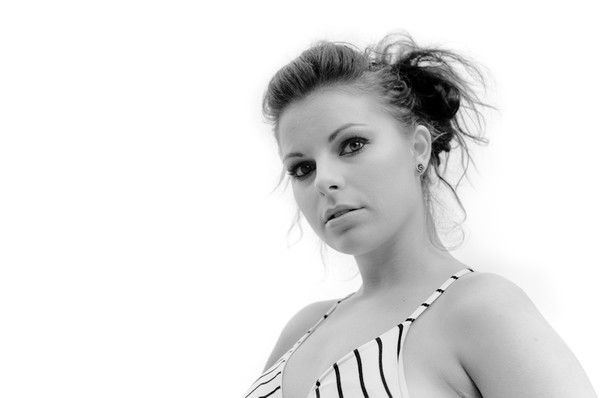
Same as above but now over expose the sky until it clips. Then us an umbrella to fill in any shadows and create a catch light in the eyes.
That's all folks!
As you can see you only need to get familiar with few light setups and reposition yourself or the model to get a different point of view and thus a different type of image. And the more your practice the more these will become natural allowing you to be more creative by tweaking a little bit.
To finish here is the video footage of Amaya Jayne:
And another one of Lyvia:
I hope you've enjoyed this post and find it useful. If you have any question or just want to say something about these, please leave a comment below.
Thanks again to everyone involve in this photoshoot!
Lighting diagram - Lyvia the Elf
Tweet
Comments
WELL DONE!!
Tuesday 25 May 2010 1:22:51 am
Commented by LEC
thanks for this post
Wednesday 26 May 2010 7:32:42 am
Commented by Dan Bachmann
Thanks for share
Monday 07 June 2010 1:30:26 pm
Commented by Hung NguyenC
Thursday 22 July 2010 11:32:00 am
Commented by digital art
digital art